

BẢN TIN CÔNG NGHỆ, Chăm sóc xe
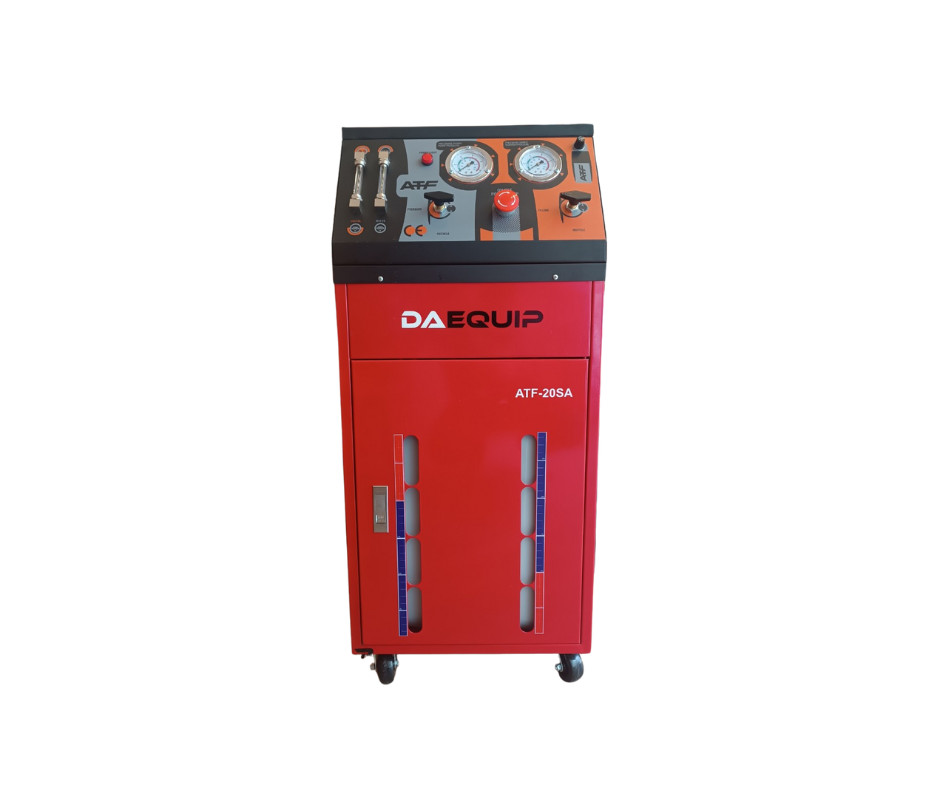
DAEQUIP ATF-20SA OPERATION MANUAL
Th4
Specifications
| Item | Description |
| Functions | Remove, clean, and replace fluid from most types and models of automatic gearboxes, transmissions, hydraulic torque transmissions, gearbox radiators and radiation pipelines |
| Power supply | 12V |
| Pump power | 250W |
| Oil Inlet and Return Hoses
|
3-(2x) 126 (L) x1/2(dia.) inches (1-red, 1-black) (1) 137(L) x1/2(dia.) inches (red); All with male and female quick couplers, 300 PSL (max.) rated |
| Pressure Gauges | Both 2-3/4 (dia.) inches;0~100 PSI, 20 PSI increments; 0~7 Bar, in 1 and 1/10 Bar increments |
| Filter | Auto Oil Filter, 4-3/4(L) x 3(dia.) inches; 17mm x 1.7 female threads |
| Fluid Capacity | 2tanks (for new and old fluids), 8 gallons per tank |
| Weight |
130lbs |
Save This Manual
You will need the manual for the safety warnings and precautions, assembly instructions, operating and maintenance procedures, parts list and diagram, Keep your invoice with this manual. Write the invoice number on the inside of the front cover. Keep the manual and invoice in a safe and dry place for future reference.
Safety Warnings and Precautions
WARNING: When using tool, basic safety precautions should always be followed to reduce the risk of personal injury and damage to equipment.
Read all instructions before using this tool!
1. Keep work area clean. Cluttered areas invite injuries.
2. Observe work area conditions. Do not use machines or power tools in damp or wet locations. Don’t expose to rain. Keep work area well lighted. Do not use electrically powered tools in the presence of flammable gases or liquids.
3. Keep children away. Children must never be allowed in the work area. Do not let them handle machines, tools, or extension cords.
4. Store idle equipment. When not in use, tools must be stored in a dry location to inhibit rust. Always lock up tools and keep out of reach of children.
5. Use the right tool for the job. Do not attempt to force a small tool or attachment to do the work of a larger industrial tool. There are certain applications for which this tool was designed. It will do the job better and more safely at the rate for which it was intended. Do not modify this tool and do not use this tool for a purpose for which it was not intended.
6. Dress properly. Do not wear loose clothing or jewelry as they can be caught in moving parts. Protective, electrically non-conductive clothes and non-skid footwear are recommended when working. Wear restrictive hair covering to contain long hair.
1. Use eye and ear protection. Always wear ANSI approved dust mask or respirator when working around chemical dusts and mists.
2. Do not overreach. Keep proper footing and balance at times. Do not reach over or across running machines.
3. Maintain tools with care. Inspect tool cords and hoses periodically and, if damaged, kept clean, dry, and free from oil and grease at all times.
4. Remove adjusting keys and wrenches. Check that keys and adjusting wrenches are removed from the tool or machine work surface before operating.
5. Avoid unintentional starting. Be sure the air pressure is in the off position when not in use and before making hose connections.
6. Stay alert. Watch what you are doing, use common sense. Do not operate any tool when you are tired.
7. Check for damaged parts. Before using any tool, any part that appears damaged should be carefully checked to determine that it will operate properly and perform its intended function. Check for alignment and binding of moving parts; any broken parts or mounting fixtures; and any other condition that may affect proper operation. Any part that is damaged should be properly repaired or replaced by a qualified technician. Do not use the tool if any control or switch does operate properly.
8. Replacement parts and accessories. When servicing, use only identical replacement parts. Use of any other parts will void the warranty. Only use accessories intended for use with this tool.
9. Do not operate tool if under the influence of alcohol or drugs. Read warning labels if taking prescription medicine to determine if your judgment or reflexes are impaired while taking drugs. If there is any doubt, do not operate the tool.
10. Maintenance. For you safety, service and maintenance should be performed regularly by a qualified technician.
11. Pacemaker safety warning. People with pacemakers should consult their physician(s) before using this produce. Electromagnetic fields in close proximity to a heart pacemaker could cause interference to, or failure of the pacemaker. In addition, people with pacemakers should adhere to the following:
-Caution is necessary when near the coil, spark plug cables, or distributor of a running engine. The engine should always be off if adjustments are to be made to the distributor.
Note: Performance of this tool may vary depending on variations in air pressure and compressor capability.
Product Specific Safety Precautions
Caution: This equipment is designed to be operated by qualified and trained personnel. It should only be operated after reading and understanding the safety warnings and operating procedures in this instruction manual.
1. Wear ANSI approved safety goggles.
2. Do not smoke near this equipment.
3. Use in a well ventilated area.
4. When leaks are found in the equipment or hoses, immediately turn off the power switch and repair the leaks.
5. Immediately clean up any fluid spills or leaks.
6. Do not use any cleaning compounds in this system.
7. Keep an empty plastic bucket nearby in case of leaks.
8. Keep a type ABC fire extinguisher nearby in case of fires.
9. Always protect your skin and eyes from contact with oil and solvents.
Warning: The warnings, cautions, and instructions discussed in this instruction manual cannot cover all possible conditions and situations that may occur. It must be under- stood by the operator that common sense and caution are factors which cannot be built into this produce, but must be supplied by the operator.
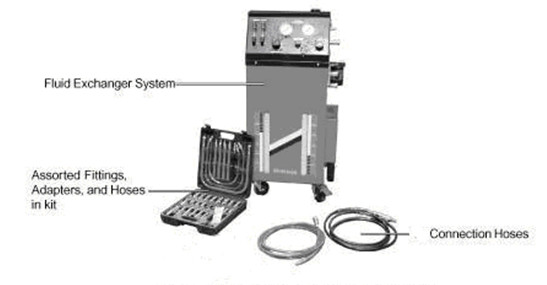
Unpacking
When unpacking, check to make sure the following parts are included. If any parts are missing or broken, please call Local Distributor.


Operation
Warning: The vehicle engine must never be started in a closed garage, or any other sealed structure. Carbon monoxide is produced during operation and is deadly in a closed environment. Early signs of carbon monoxide poisoning resemble the flu, with headaches, dizziness, or nausea. If you have any of these signs get fresh aer immediately.
Preparation
1. Place vehicle on a hoist or on secure vehicle stands in a well ventilated area.
2. Set vehicle emergency brake and turn engine off.
3. Locate the hose connection points on the transmission and its radiator.
See illustration below. Refer to the vehicle manufacturer’s maintenance manual and adhere to all safety warnings and instructions in this manual.
4. Place the Transmission Oil Exchange (TOE) unit to one side of the vehicle.
5. Connect plug of the TOE with insured electrical outle
6. Have new transmission fluid or cleaning solvent ready for use near the TOE.
Cleaning Cycle
1. Disconnect the transmission return line from under the transmission and from the automatic transmission cooler.
2. Connect the TOE Black Hose (return line) to the oil outlet connector under the transmission. (Supplied Adapters or Fittings may be required.) Connect the other end of the Black Hose to the TOE Return Adapter Fast Connector. See illustration below.
3. Connect the Red Hose (pressure line) from the TOE Pressure Adapter Fast Connector to the oil inlet connector on the transmission radiator.
4. Using one of the Adapter Kit clear hoses, connect it to the TOE New Oil input Hose Connector. Insert the other end into the cleaning solvent container (to the bottom). Refer to the vehicle manufacturer’s maintenance manual for approved cleaning solvents.
5. Turn the (left) Fuel Pressure Recycle Control knob to the Pressure position.

6. Turn the (right) Filling-Recycle Reverse Control knob to the Filling position.
7 After lift the vehicle up, turn on the power switch of the TOE, the cleaning solvent in now injected into the transmission.
8. After injection, turn off the power switch then turn the (left) Fuel Pressure Recycle Control knob to the Recycle position.
9 Turn the (right) Filling-Pressure Recycle Reverse Control knob to the Recycle position.
10. Start the engine to begin the cleaning process. This should take five minutes. During this process, View the fluid flow through the View Flow tubes.
11. Turn the engine off after five minutes.
12 Begin the steps for the Oil Exchange Cycle (below).
Oil Exchange Cycle
1. Leave the Black Hose(return) and the Red Hose(pressure) connected as described in the previous steps, but disconnect the hose to the TOE New Oil Input Hose Connector.
2. Review the vehicle manufacturer’s maintenance manual for the correct type and amount of transmission fluid oil.
3. Remove the Oil Fill Cap on the top of the TOE and pour in the correct amount of new transmission fluid oil. View the amount of fluid filling the TOE New Oil Tank Gauge.
4. Turn the (left) fuel Pressure Recycle Control knob to the Pressure position.
5. Turn the (right) Filling-Recycle Reverse Control knob to the Recycle position.
6. Turn on the power switch of the TOE begin the Oil Exchange. The pump pressure will force the new oil into the transmission, start the engine while View the new oil flow in the new oil window.

7. During this process, View the new and used oil flow rate. They should flow at equal rates. If used oil flow fast than new oil, please adjust the ball valve fixed on the oil black return line to make them have the same flow rate.
8. During the oil exchange process, switch gears in sequential order, starting with first gear. Keep in each gear for 10 seconds.
9. During this process view the oil flow through the TOE New and Used Oil View tubes. When the color of the oil is the same in both tubes, turn off the engine and power switch of the TOE, the process is complete.
10. Reconnect the vehicle oil output (return) line from the transmission to the input of the transmission radiator. Securely tighten clamps.
Emptying Old Oil
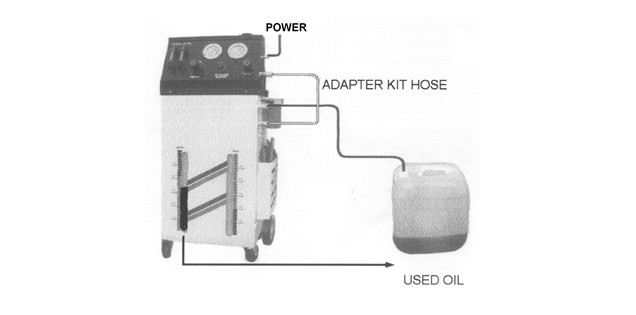
1. Using an Adapter Hose from the kit, connect one end to the TOE New Oil Input Hose Fast Connector, and the other end to the TOE Return Adapter Fast Connector. See illustration below.
2. Connect the Black Hose to the TOE Pressure Adapter Fast Connector. Place the other end of the Black Hose in an appropriate disposal tank.
3. Turn the left Control knob to the Pressure position.
4. Turn the right Control knob to the Filling position.
5. Turn on the power switch of the TOE ,View the used oil movement through the used oil View Flow tube.
6. When all the used oil is transported from the TOE Used Oil Tank, turn off the power switch of the TOE. Recover all the hoses to its original position.
7. Dispose of used oil and solvents in a proper manner as dictated by local environmental codes.
Maintenance
1. Drain all hoses that were used in an appropriate oil disposal tank.
2. When finished using the TOE, coil the Red and Black Hoses and place in the TOE side holder. Place the Adapter Fittings and Hoses back in their case. Store the case in the top-back of the TOE.
3. When oil flow through the TOE becomes very slow, even with higher air pressure, replace the TOE oil filter.
Troubleshooting
1. Turn on the power switch of the TOE but it does not operate.
check the power indicator is light or not.
Check the pump work or not
2. The hoses are connected but no oil flow is viewed from the View Flow tubes, even with higher air pressure.
verify the correct settings of the Fuel Pressure-Recycle Control knob and the Filling-Recycle Reverse Control knob.
3. The hoses are connected but no oil flow is viewed from the view Flow tubes, even with higher air pressure, and the engine running.
Check to see if the direction of the oil inlet and oil return hoses are reversed.
Adapter and Fitting Kit Parts List